This is a sponsored conversation written by me on behalf of Cricut. The opinions and text are all mine.
Good morning! This year is flying by! I seem to say that every single year! ha! Buuuuut can you believe that it is almost March? Spring Break & St. Patrick’s Day will be here before we know it! Annnnnd today I am excited to celebrate St. Patrick’s Day with Cricut. I used my Cricut Maker to make some cute & easy DIY St. Patrick’s Day Crafts with my kiddos. We made some cute t-shirts, a lucky horseshoe, cute lucky clover socks & a cute St. Patrick’s Day card all with the Cricut Maker. Let’s get started! :)


Having kiddos makes all the holidays so much fun! These two kiddos are homeschooled, so I still try & make the holidays even extra fun & special since they won’t be at school making crafts there. Let me show you what we made this year! :)
For these projects you will need:
Cricut EasyPress 2
Cricut EasyPress Mat
Cricut Heavy Chipboard
Cricut EveryDay Iron-on
Cricut LightGrip mat
Cricut Maker
knife blade
Cricut StrongGrip mat
Cricut Essential Tools
Cricut Glitter Iron-on
cardstock
tape
spray paint
green & white t-shirts
white socks
these Design Space files
I’ve told you about the knife blade before. It’s an amazing little tool, and only works with the Cricut Maker! This blade can cut through thicker & denser materials such as:
• Balsa wood, up to 3/32”
• Basswood, up to 1/16"
• Tooling leather, up to 7 oz
• Garment leather, up to 5oz
• Cricut Chipboard, 2mm
• Matboard, 2-ply or 4-ply
• Craft foam, up to 3mm
I used it to cut through balsa wood before, and I was excited to try it on chipboard. Tips when using the knife blade: You will need to use a StrongGrip mat. You will also need to slide the white rollers out of the way before you start cutting. You will also need to secure cutting material to the mat with tape, so you won’t have any slipping as you cut.

This chipboard is nice & thick! The knife blade cut through it beautifully! :)


I used black spray paint to paint it black. Hang it above the door or use it as party décor or photo prop.

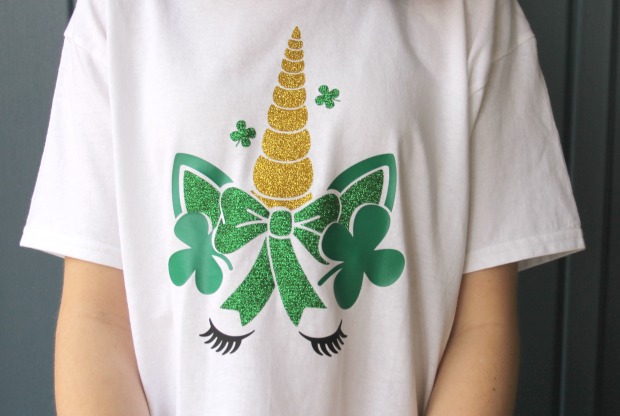
Now let me show you how I made some cute St. Patrick’s Day t-shirts. I cut everything out with my Cricut Maker & then used my EasyPress 2 to apply them to the tees. I love my EasyPress 2! It heats up so fast, and I get perfect iron-on results every single time. For my daughter’s St. Patrick’s Day unicorn tee, I used both glitter and everyday iron-on. When you are using two types of iron-on put the one that needs the higher temperature setting on first (the glitter iron-on) and then apply the cooler temp iron-on (the everyday iron-on) last. TIP: Use the Cricut EasyPress™ Interactive Quick Reference Guide to get the perfect EasyPress settings for whatever project you are working on. :)


When you do that you will get perfect results every time. :)

I made the other tee in very much the same way. I love this cute cut file from Design Space.


I also decided to make some cute clover socks for my daughter. I found these plain white socks on Amazon.

I cut outs some cute little glitter shamrocks with my Maker & glitter iron-on.

Then I used my EasyPress 2 to apply them to the socks.

So cute! :)

Then just for fun, we made a cute St. Patrick’s Day card with white & green cardstock. It was so easy! I just cut it out with my Maker & assembled it. On St. Patrick’s Day, we can make some goodies & then attach the card & take it to a neighbor. :)

How do you celebrate St. Patrick’s Day? Let me know in the comments below. :)
Check out these other fun Cricut posts below.
Make Your Own Embroidery Patterns with the Cricut BrightPad

Cute Organization with the Cricut BrightPad

Everything You Need to Know About the Rotary Blade
What would you make with your Cricut Maker? Let me know. :) Please pin this post for later!

Thank you so much stopping by my blog!
If this is your first time visiting, I’d love to keep in touch.


