
This is not a sponsored post, but affiliate links are used for your convenience. Thank you for supporting Ginger Snap Crafts. :)
Good morning! Hello there! Can you believe it’s already February! Eek! Time just doesn’t stop! ;) We just passed our 6 month in our new house anniversary. (Is that a thing? ha!) What do you think is the perfect housewarming gift? I’ve done some thinking. Annnnnd I have decided that it is…..disposable dinnerware. Not having to wash dishes was a life saver for me in the first few weeks in our new home. So today I’m going to show you how easy it was to make this cute Home Is Where the Heart Is tote bag. Fill this cute little bag with disposable dinnerware & you will have the perfect DIY Housewarming Gift in no time at all. Let’s get started!


For this project you will need:
canvas tote (I found mine at Hobby Lobby!)
Cricut Iron-on Lite, black & red
Cricut Patterned Iron-on (I used a print from this pack.)
Cricut EasyPress or household iron
Cricut EasyPress Mat
this Design Space cut file
Cricut Maker or Cricut Explore Air 2
Cricut Essential Tool Set
I love, love, love the patterned iron-on. You can find so many fun uses for these fun designs from totes, t-shirts, throw pillows & more. You can mix & match designs, and design a project that is perfect for you! I’m kind of partial to the black & white designs. The florals are fun too though! You can see the cute bunny shirt I made my daughter here.

I shared the cut file link above, but let me show you how easy it is to come up with own personalized designs by combining cute design cut files in Cricut Access & fun Cricut fonts & tools in Design Space. First, I picked out a cute home design. Remember with your Cricut Access membership you have access to thousands and thousands of cut files.I highly recommend getting a membership. You can do that right here.

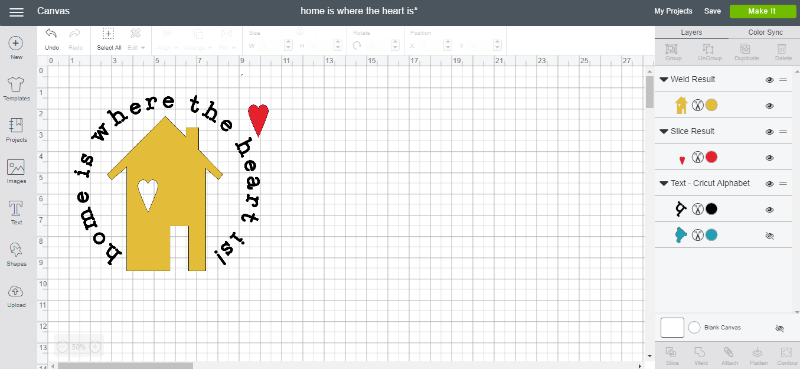
Next, I picked one of my favorite Cricut fonts, Cricut Alphabet, to type out “home is where the heart is!”, and then I used the all new curve tool to curve my text around the home. So cute!

You can not layer Cricut patterned iron-on when you apply it, but you can use the slice tool to achieve the same look. Let me show you how. I wanted the heart to be red. So I added a basic square shape.

I sent the square to the back, so my house was in front. I moved the house over the square.

Next, I clicked slice and it cut out a small heart where the two shapes overlapped. Isn’t that cool? Delete the extra piece.

Now we are ready to send our design to our Cricut Maker. Wasn’t that easy? Be sure to pin this post for later!
Tip: When you are working with any type of iron-on product be sure you mirror the image before cutting. Especially if you have words. You’ll want them to cut backwards, so when you apply your iron-on if will be facing the right way.

Once everything was set. I loaded my mat patterned side down for the Cricut Patterned Iron-on and shiny side down for the Cricut Iron-on Lite. Hit go and watched my Cricut machine get to work!

Next, weed your iron-on. That’s just the fancy way to say remove the excess iron-on leaving your design behind.

The next part is a little tricky! You'll want to press the material with the higher temperature setting first (the patterned iron-on). Wait for it to completely cool, remove the plastic sheeting and then press the second layer (the iron-on lite). Allow to cool completely and then cold peel the plastic sheeting! Cold peel just means waiting for your design area to cool down completely. Let me show you how it’s done. First, I put my home design where I wanted it.

TIP: Using an EasyPress Mat is so helpful with all iron-on and sewing projects. They are awesome! I placed my mat underneath the tote bag. If your bag is big enough, you could slip the EasyPress Mat right inside.

Since my tote material was cotton canvas, I set the temperature for 340. I preheated the area for 5 seconds, then applied my design on with gentle pressure for 30 seconds. Then I left the liner on, flipped the tote and pressed for 15 seconds. Then I waited for it to completely cooled, and then cold peeled the plastic liner. Tip: You can find all the recommended temperature & time settings for whatever material your are working with for your EasyPress right here.

Then I put my heart in it’s perfectly cut out spot and then added the words “home is where the heart is”. Tip: Make sure the house is completely covered with the liner.

I adjusted the temperature setting to 315, and then pressed for 30 seconds. I flipped it over again & pressed for 15 seconds on the back leaving the liner on.

Wait for the design area to cool, then slowly peel back the lining leaving your cute design behind.

Fill your back with plates, forks, spoons, knives & cups.

Annnnnd then drop it by your new neighbor’s house? They will love you for it! ha!
Have you ever received a fun housewarming gift? What was your favorite? Are you a fan of the new patterned iron-on? Let me know your favorite design in the comments below. Don’t forget to pin this post for later.
Thank you so much stopping by my blog!
If this is your first time visiting, I’d love to keep in touch.

