
Good morning! This summer we will celebrate our 2 year anniversary in our new home, buuuuut believe it or not I still have projects from our old home that I haven’t shared! ha! Sooooo I thought I’d better get on that. ;) This is a tutorial I shared as a guest post on another blog several years ago, and it inspired the real shiplap we have in our home now. I just love clean look at shiplap (or planks!). Annnnnd I hope this design trend becomes a staple for many years to come. It’s also an easy weekend project that just about anyone can tackle with just a few inexpensive supplies and a few hand tools. We spent under $50 for this project. Let me show you how! :)

Shiplap will instantly add that warm, cozy feel of farmhouse to your space. This space was totally transformed in one afternoon & all for under $50. It’s surprisingly easy to pull off, and installing shiplap could be the perfect beginner DIY project to tackle in your home. It instantly brightens up a space. :) Let me show you the easiest way to install a DIY shiplap wall in one afternoon. First, choose a wall in your home. A master bathroom is a great room to experiment with. ;) We decided to shiplap the area around our bath tub.

Seeeee! Shiplap can totally transform a space from drab to fab. :)

Let’s get started on this project. First, you will need to gather some supplies.
Supply List:
- 2 birch sureply sheets (4 foot by 8 foot sheet) We found these at Lowes.
- clamps
- 2x4 board
- skill saw or jig saw
- table saw or joiner
- nail gun
- 1 inch brad nails
- leveler
- stud finder
- pencil
- wood filler
- sander
- sandpaper
- caulk
- cabinet & trim paint
- foam roller brush
- paint brush
- putty knife
- quarters (You’ll see why in a minute!)
For this project, we used 2 sheets of birch sureply. It is lightweight, easy to cut & comes already primed & ready to paint. And best of all it’s cheap! For this project, we spent under $50 for all of our supplies including the shiplap. Not only does shiplap look great, it is also very, very economical.

There are several ways to cut your planks. The easiest way is to have your home improvement store cut them for you or you can to what we did, cut the planks yourself. After cutting our own planks, I would recommend having the professionals cut them for you. It can get a little hard to cut super straight lines on such a long stretch of board. Let me show you how we did it just in case you want to try this yourself. It is totally doable, just a little bit tricky. You will also need a big stable area to work on if you cut your planks yourself. We used some clamps & a 2x4 to secure our birch sureply sheet to a table. Notice we have both sheets of birch sureply on the table. We will be cutting two planks at a time. The 2x4 also acts as a guide as you cut, so make sure it is nice & straight before you clamp it on. Your board needs to overhang on the side you will be cutting.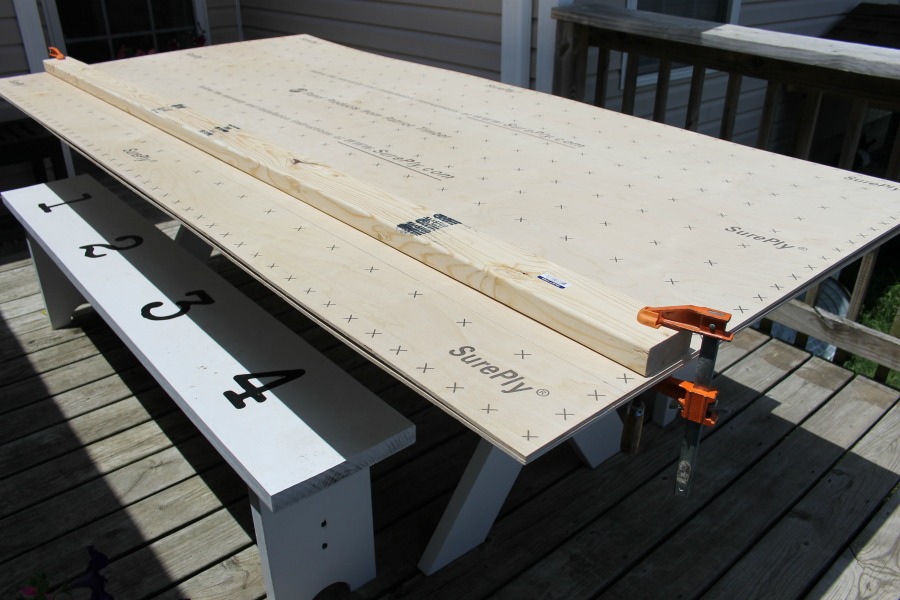

There is not a set measurement on how wide to cut your planks. We decided to cut our planks 5 1/2 inches wide. This is how our planks looked all cut out. After you cut your planks, you can run them through a table saw or use a joiner to straighten up the edges if you need to. When you are finished cutting the planks, be sure to sand the cut edges with your sander. You want your planks to be nice and smooth on the edges.

Now it’s time to plank your wall! There is also several different ways you can do this as well. You can stagger your boards or have them all line up. We chose to have our boards all line up. I loved the cleaner lines you get from doing it that way. It’s all just a personal preference. There is really no right or wrong way to do it. You could also do these vertical. Vertical shiplap is super popular right now. When installing it horizontally, you can start at the top of your wall or the bottom. Again, there is not a right way or wrong way to do that either. We decided to start at the top. We thought we’d have a better chance of getting our boards level that way. The first board you put up is the most important. You need that board to be as level as possible. This is a two person job! Use a large leveler and have one person hold the board & level in place while the other nails the board in.

We started our project around the back window. We knew this window had a larger header around it, so we didn’t use a stud finder for this part of our project. We knew we’d be nailing right into the wood. If you are unsure, use a stud finder and mark your studs before nailing your board into the wall. Also, you can put the planks up several different ways. I didn’t want this to be a permanent addition to our home. Who knows if shiplap will be trendy in a few years? So we used small 1 inch brad nails to plank this wall. These nails are small, & later on it will be super easy to rip the planks off the wall. We should have minimal wall damage when they are removed. Of course, we moved waaaaay before we got tired of the shiplap! Everything was intact when we left.

Spacing! You’ll want your planks to have the exact same space between each one of them. I wanted my planks pretty close together, so we used quarters as spacers. I’ve also seen other DIYers use nickels. It’s all a personal preference. Also, one more tip, if your wall is painted a darker or brighter shade than mine, you’ll want to paint your walls a light color before you plank. If your walls are a bold color, you will be able to see that color in between the gaps of your planks. You don’t want that. ;)

Also, take into account windows and existing trim. You’ll have to plank around those things. We cut smaller planks that fit around our window sill and nailed them into place using the nail gun. Around the window trim we had to custom cut a few planks to fit just right. You can use a jig saw to do this.

After we got the harder back wall planked, it was time to move on to the side walls. This is when it got really easy & fast. First, we marked our studs using a stud finder, yardstick & a pencil.

Then we started at the top again and worked down. We lined up our planks with the back wall planks, so they would meet in the corners. If you notice, our walls were not completely square (most walls aren’t….that’s totally normal), so we had to cut a tiny plank to fill in the gap at the top. You won’t even notice that when we’re done.

After you are completely done planking your walls, it’s time for some wood filler. (Make sure it’s paintable wood filler!)

Fill in all the nail holes with a small dab of wood filler. This is also a great time to caulk the trim around the window and window trim. I also caulked down the seam where my planks met in the corners. Caulk around the outside edges of your planks as well.Once the wood filler dries, sand it down. Then paint at least 2 coats of cabinet & wall trim paint. I painted 3 coats. As you paint, use a putty knife to remove any paint that drips between your planks. Let dry. All done!

Are you ready to try some shiplap in your home? You will love the cozy, warm, farmhouse feel it adds to your space. Go ahead, give shiplap a try! I think you’ll love it as much as I do. :)


I hope you enjoyed this tutorial. Please pin it for later. Thank you! :)
Connect with me on facebook or instagram.
Question or comment? Shoot me an email at ginger@gingersnapcrafts.com. :)

Thank you so much for stopping by my blog!
If this is your first time visiting, I’d love to keep in touch.

.
