I'm so excited to introduce you to Kitty from Neko Knits.
Kitty & I joke back & forth that she's my blog stalker, ;)
but seriously it's me who stalks her!
She is fabulous, talented & smart,
& the perfect guest host
for this week's fab friday.
Take it away, Kitty!
Hello all!
Kitty & I joke back & forth that she's my blog stalker, ;)
but seriously it's me who stalks her!
She is fabulous, talented & smart,
& the perfect guest host
for this week's fab friday.
Take it away, Kitty!
Hello all!
Around my house everyone calls me Kitty,
I'm a nursing student who crafts to de-stress from nursing school.
I started blog stalking Ginger a few months ago when she was hosting a giveaway and have been at it ever since, I was so excited she asked me to guest blog on Ginger Snaps.
This is one of my most recent projects,


This is one of my most recent projects,

A gal at work was getting married and I'm a starving student right now,
but I love to give pretty wedding gifts.
So I put the crafting super powers to work, here's a closer look

Pretty nice, right?
Well it's super easy to cross stitch onto other fabrics.
All you need is some waste fabric which is easily
found at you local craft store in the embroidery section.
Step 1.

Measure and cut out the appropriate amount of waste fabric.
Remember those blue lines indicate
5 stitch increments,
not the ten that are blocked out on patterns.
I made this mistake.
Step 2.

Then fold it in half length wise then width
wise to find the center.

Mark the center with a pin
Step 3: Secure your fabric

Line up the center of your waste fabric with the
center of your towel and fasten the waste fabric securely.
Ensure that the waste fabric is on straight and very flush to the towel.
If you are doing a larger piece of work I would suggest sewing the fabric down with a few large baste stitches, but for a small project like this a few pins work just fine.
Now you can stitch away!
Step 4: Get Rid of the Waste
Step 4: Get Rid of the Waste

Trim the excess waste fabric from around the design.
Hang on to those scraps!
I use decent sized pieces to put
tiny bits of embroidery on baby clothes.

Fray the edges by pulling the threads out one
at a time both length wise and width wise.

You may want a pair of tweezers to help pull out
the threads that are under the embroidery.
Be patient and pull in a smooth motion,
don't jerk or snap as you'll just end up breaking
the thread you are trying to pull out.
It's a lot like tweezing your eyebrows!
Seriously, use that same even motion.
To give your project a nice finished look press the embroidery on both sides with an iron set on medium and put a cloth between the work and the embroidery.
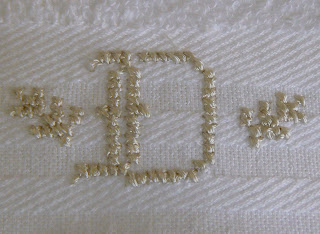
Then stand back and admire you work.

Now you can make your own set of personalized hand towels,
but don't stop there you personalize any fabric now!
OR
You could check out my blog.
To celebrate reaching
50 followers
I am going to give a set of these towels away!
You can enter too!
Thank you so much, Kitty.
Don't forget to head over to her blog
& enter her {fabulous} giveaway!
Also, you still time to link up at my
{wow} me wednesday link up party.
Have a {fabulous} weekend everyone!
What are your plans?